
Introduction to iptables
- Div0 Blog Editor

- Jun 2, 2012
- 6 min read
netfilter/iptables is a de facto IP packet filtering tool used in Linux operating system (OS). iptables provides features for system administrators to filter packets coming in and going out of the system by inspecting packets' header. The packet filtering operation is performed on OSI layer 4 and below within the kernel itself.
iptables' Tables
iptables uses tables to provide comprehensive packet filtering functions. In this tutorial, I will be covering 3 main features provided by iptables:
Filter: Provides the main packet filtering operation.
Conntrack: Allows iptables to be configured as a stateful firewall.
NAT: Provides network address translation (NAT) operation.
iptables Packet Flow
It is important to understand the packet flow and the filtering points of iptables to fully grasp your packet filtering configuration.

PREROUTING: Filter packets that first arrived at the system.
Routing Decision: Determine whether packets are destined for the local system or forwarded/routed using a routing table.
INPUT: Filter packets that are destined for the local system.
OUTPUT: Filter packets that are sent from the local process.
FORWARD: Filter packets that are routed through the local system.
POSTROUTING: Filter packets prior to leaving the system.
The INPUT and OUTPUT filtering points are heavily used by system administrators to filter IP packets whilst PREROUTING is an interesting filter point that is used to configure NAT.
In this tutorial, I'll be covering different filtering functions provided by iptables. By the end of the tutorial, you will be able to configure your iptables to filter packets coming in and going out of your Linux system, configure your iptables as a stateful firewall, configure your iptables to perform NAT, and administer your iptables using fwbuilder.
Filters
I'll be using 2 Linux machines for my tutorial:
iptables running on a Red Hat server (IP address: 192.168.1.10); and
A client machine, running Ubuntu (IP address: 192.168.1.20), attempting to communicate with the Red Hat server.

iptables look into its configuration file, /etc/sysconfig/iptables, when the service is starting.
The default iptables Rules:

To look at the executing packet filters:
service iptables statusThe default iptables Status:
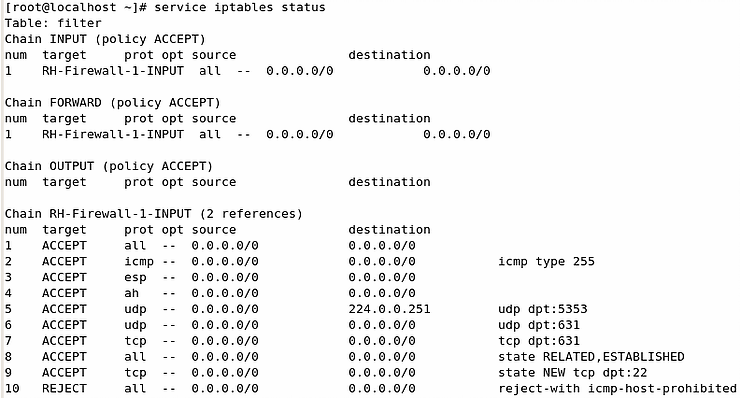
The default iptables filter suggests that all IP packets that reach the INPUT and FORWARD filtering point to be handled by a rule chain named RH-Firewall-1-INPUT.
We will not be using the default filtering rules in this tutorial. But first, backup the default iptables configuration (good practice):
cp /etc/sysconfig/iptables /etc/sysconfig/iptables.origFlush out all existing filtering rules and overwrite the configuration file such that iptables will not boot into the default filtering rule in the future.
iptables -F
iptables-save > /etc/sysconfig/iptables

Writing Your 1st Filter
A firewall is useless without any filtering rule. Here we see that my Ubuntu machine can ping my Red Hat server without any problem.

Add a rule to drop all packets from my Ubuntu machine.
iptables -A INPUT -s 192.168.1.20 -j DROP
Now my Ubuntu machine can no longer communicate with my Red Hat server.

Append v. Insert
iptables filtering rules are read by the system as an ordered list. Therefore, the order of the filters is very important. If, we append an ACCEPT rule after the DROP rule, the Ubuntu client will still not able to ping the Red Hat server.
iptables -A INPUT -s 192.168.1.20 -j ACCEPT

Now we remove the DROP rule that is ordered above the ACCEPT rule:
iptables -D INPUT 1
The Ubuntu client will be able to ping the Red Hat server again.

Now, let's look at the difference between appending (-A) and inserting (-I). If we insert an ACCEPT rule before the DROP rule:
iptables -I INPUT -s 192.168.1.20 -j ACCEPT
The Ubuntu client can still communicate with the Red Hat server as the ACCEPT rule was read by iptables before the DROP rule.

Filtering Your Network Interface & OUTPUT Filtering Point
For machines with multiple network interfaces, iptables allows you to set rules specifically for each individual network interface.
Here, I allowed all localhost packets and DROP all packets destined to my Ubuntu machine from my network interface eth1.
iptables -I INPUT -i lo -j ACCEPT
iptables -I OUTPUT -o eth1 -d 192.168.1.20 -j DROP
iptables filter DROP all outgoing packets to the Ubuntu machine.

The Ubuntu client will not be able to receive any reply from the Red Hat server.

OSI Layer 4 (Transport) Filtering
A firewall is not particularly useful if it can only filter packets based on IP addresses and subnets. iptables is usually used to filter packets based on transport protocols and ports.
If your server is running a web server but does not allow SSH connection to it, you need rules to accept communication to port 80, and drop connections to port 22:
iptables -A INPUT -p tcp --dport 80 -j ACCEPT
iptables -A INPUT -p tcp --dport 22 -j DROP
And if you need DNS services, you will need to communicate with a DNS server's port 53:
# iptables -A INPUT -p udp --sport 53 -j ACCEPTThe "Catch-All" Rule
Last but not least, it is always a good practice to append a "catch-all" DROP rule at the bottom of all firewall configuration:
iptables -A INPUT -j DROPThis is called the fail-safe defaults.
Fail-safe defaults: "Base access decisions on permission rather than exclusion. [...] design must be based on arguments why objects should be accessible, rather than why they should not. In a large system some objects will be inadequately considered, so a default of lack of permission is safer. A design or implementation mistake in a mechanism that gives explicit permission tends to fail by refusing permission, a safe situation, since it will be quickly detected. On the other hand, a design or implementation mistake in a mechanism that explicitly excludes access tends to fail by allowing access, a failure which may go unnoticed in normal use."
Jerome H. Saltzer & Michael D. Schroeder.
The Protection of Information in Computer Systems. 1975.
iptables-save & restore
Before you switch off your local system, you can see that the file /etc/sysconfig/iptables is still empty despite all the configurations you have made. This is because the configurations are not saved on disk by default.
To save your new configuration to disk:
iptables-save > /etc/sysconfig/iptablesTo restore/load your default iptables filters (which we saved a copy of earlier):
iptable-restore < /etc/sysconfig/iptables.orig
Or you can just restore using disk operations:
cp /etc/sysconfig/iptables.orig /etc/sysconfig/iptables
service iptables restart
If you are confused with the syntax, man iptables is your best friend.
Stateful Packet Filter
So far, we have been configuring our iptables filters, to ACCEPT or DROP packets based on packets' header information so far — as a stateless packet filter. Such filters can easily by circumvent by communicating with the server as though you are responding to it rather than initiating one. Stateful packet filters address the drawback of stateless packet filters that consider each packet in isolation by keeping a table containing records of all current connection.
iptables has the ability to track four type of connection states:
NEW: Packet belongs to a new connection.
ESTABLISHED: Packet belongs to an existing connection (i.e. reply packet).
RELATED: Packet belongs to a related existing connection.
INVALID: Unidentified packet.
To ACCEPT all ESTABLISHED or RELATED packets:
iptables -A INPUT -m state --state ESTABLISHED,RELATED -j ACCEPTIf you are running an SMTP server, you will need to accept NEW connections to your server:
iptables -A INPUT -m state --state NEW -p tcp --dport 25 -j ACCEPTAnd to DROP all other NEW or INVALID packets:
iptables -A INPUT -m state --state NEW,INVALID -j DROPNetwork Address Translation (NAT)
NAT is a process of modifying IP address information in packets' header allowing you to hide internal sensitive IP addresses to your public IP address.
To hide your HTTP request behind a proxy:
iptables -t nat -A OUTPUT -p tcp --dport 80 -j DNAT --to-dest 192.168.1.2:3128To hide behind another machine:
iptables -t nat -A POSTROUTING -p tcp --dport 80 -j SNAT --to-source 192.168.1.3If you are running a web server using your internal IP address:
iptables -t nat -A PREROUTING -p tcp --dport 80 -j DNAT --to-dest 192.168.1.10 Firewall Builder
In this last bit of the tutorial, I will be demonstrating (on my CentOS 6 machine) how you can easily manage iptables using a GUI tool — fwbuilder. First, acquire the RPM [here].
Install fwbuilder and start it up:
rpm -ivh fwbuilder-5.1.0.3599-1.el6.i686.rpm

which fwbuilder

fwbuilder &
Start by creating a new Firewall object i.e. a representation of your machine that is running iptables:

fwbuilder provides template rules:
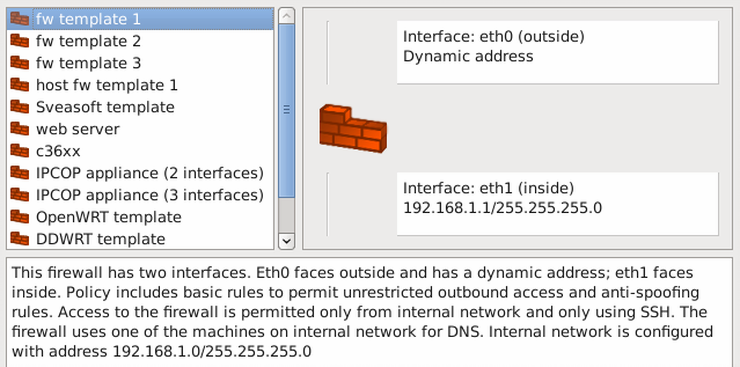

As I'm running a Web service on my CentOS machine, I will need machines from my "inside network" to be able to access TCP port 80.


Compile and install your new packet filtering rules.
Now, you have your new iptables rules up and running without in-depth understanding of iptables' syntax. But you know them anyway, because you read the earlier sections of the tutorial.


Author
Emil Tan, Skipper & Co-Founder of Div0.


Comments